Welcome: Shenzhen Zhuolida Electronics Co.TD
Language:
 ∷

∷
∷
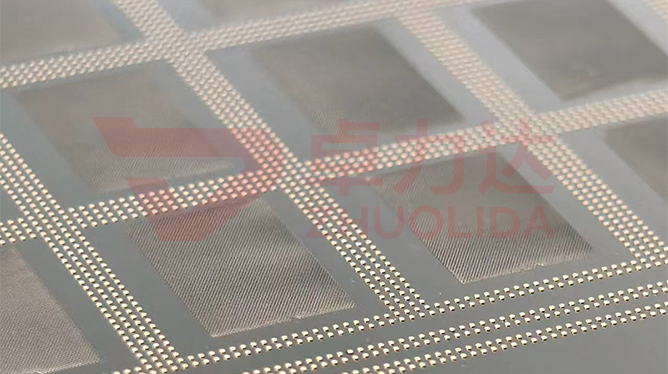
Off the mandrel, the nickel foil is still a limp sheet. Its several hundred thousand apertures have grown and ±3 μm aperture accuracy has been measured, but it cannot stand on its own — it has to be stretched onto an aluminium frame before it reaches the printer. Electroformed stencil frame bonding governs exactly that stretch: how AB adhesive is mixed, how thick it is spread, how far it is cured, in what order the four edges are pulled and which tension band is set. What ships is a framed, taut stencil that does not spring back after a night on the shelf. Unlike deposition, there is no slow tuning in a bath here; the working window collapses into the minutes between coating and cure, and once the adhesive gels there is no second chance to revise tension. The line calls this framing and treats it as muscle work, yet half of whether ±7 μm position accuracy holds under the squeegee is staked on it.
When something goes wrong the blame usually lands on electroforming, though the foil has little to do with it. Someone mixes the A and B parts of the AB adhesive by feel, skimps slightly on hardener, and the joint looks set at room temperature; after a few days of printing the bond creeps, tension drops a band, the corners slacken first and the mesh billows into a wave under a long squeegee stroke, so one side releases while the other still clings. Wrong pull order is more common still: lock one edge, then haul on the diagonal, and a nine-point check reads 50 N at the corners against 32 N at the centre — paste volume tapers left to right across one sheet and no print-parameter tweak will level it. Another lot came from a frame with poor flatness and an uneven bond line; the thin foil went on pre-stressed, and a vision re-check after one night found position 6 μm out, which the customer read as unstable electroformed dimensions. Pulled apart, one fault is adhesive, one is tensioning, one is the frame. Electroformed stencil frame bonding exists to bring all three under one set of parameters, because staring at foil data alone never finds the root.
Parameter Window
• Tension set in 10–55 N bands, ±1 N internal control, corner-to-centre spread read by the nine-point method
• Stencil thickness 15–200 μm; foils under 30 μm need temporary support during framing to prevent sagging
• Position accuracy ±7 μm and aperture accuracy ±3 μm, each re-checked before and after framing
• Substrates up to 610×660 mm; large panels are more sensitive to frame flatness when stretched
• AB adhesive cure temperature and time verified per lot, bond-line thickness held to its own tolerance
• Nickel alloy hardness 450–550 Hv; at the upper bound the foil springs back more, so framing needs allowance
Manufacturing Process (8 Steps)
1. Frame check — measure aluminium frame flatness and corner height difference on the rig; correct an out-of-tolerance frame before coating.
2. Foil re-check — measure position, aperture and thickness of the demolded foil to confirm the pre-framing baseline.
3. Adhesive preparation — mix AB adhesive to ratio, de-gas it, and control bond-line thickness and bead width with no trapped bubbles.
4. Alignment and pre-stretch — register the foil on the frame, pre-pull all four edges together, and support thin zones temporarily.
5. Graded tensioning — ramp toward the 10–55 N target band in steps, adjusting against nine-point readings rather than one hard pull.
6. Cure to shape — cure AB adhesive along a controlled temperature curve with tension locked and clamps untouched throughout.
7. Stress release — low-temperature anneal plus a rest period lets adhesive creep and foil spring-back finish before re-measurement.
8. Final check and packing — re-check tension and position, log vision and flash measurement results, label the band and ship.
Core Advantages
1. Even tension — the nine-point method levels corners against centre, so paste volume no longer gradients across one sheet.
2. Creep held in check — mix and cure curve fixed per lot, so the joint does not slacken after a few thousand prints.
3. Stable position — pre-stress released before delivery, so ±7 μm readings before and after framing agree.
4. Large panels covered — a flattened frame for 610×660 mm substrates keeps wide-area grids flat.
5. Clean band separation — each of the 10–55 N bands is set independently, so Ball and Flux stencils never cross bands.
6. Repairable records — electroformed stencil frame bonding files adhesive lot, tension curve and nine-point readings together, so a fault traces back to the shift.
Typical Applications
1. SMT printing stencils on lines with frequent swaps, where framing consistency sets first-article yield.
2. WLP ball-placement templates for 4–12 inch wafers, fussier about tension uniformity at millions of openings.
3. Ball and Flux stencils for ABF substrates, framed separately in different 10–55 N bands.
4. Mini LED and BGA fine-pitch printing, where position drift surfaces before aperture problems do.
5. Large-format photovoltaic grid stencils, where frame flatness and long-edge tension sharing are the hard part.
6. Composite stencils with post height or local thickening, where step zones need tension controlled by region.
Design and Selection Notes
1. Fix the tension band first. Pick one band within 10–55 N per product, never mix bands in a lot, and record Ball and Flux apart.
2. Pre-pull all four edges together. Lock one edge then haul the diagonal and the nine-point check will always show high corners and a low centre.
3. Verify AB adhesive ratio per lot. Half a point off on hardener is invisible at room temperature and shows up as creep days later.
4. Do not rush the cure. Release the clamps only after the temperature curve finishes; unloading early gives away half the tension.
5. Foils under 30 μm must go onto the frame with temporary support; a hard pull leaves permanent slack in dense aperture fields.
6. Measure frame flatness piece by piece and correct frames with excessive corner height difference — no bond line will fill that gap.
7. Judge only after a rest. Tension read straight off the rig does not count; the anneal plus an overnight re-check is the delivery figure.
Taken on its own, electroformed stencil frame bonding is both a final audit of pre-treatment, deposition and demolding, and the last window where the print end can still change the foil's state. The adhesive gives 'it stays taut', graded tensioning gives 'it stays even', and cure plus stress release gives 'it stays put afterwards'. Miss one and ±7 μm position accuracy will not survive the squeegee. What separates capable lines is not whether a foil can be stuck to a frame at all, but whether a dozen sheets from one shift, and then another shift, all show nine-point tension inside the same band. For fine-pitch or large-panel orders, write the AB adhesive ratio, cure curve and tension band into the framing card at sampling stage and run to that card in production — far cheaper than endlessly retuning squeegee pressure, wiping the stencil and compensating paste volume at the printer. On paper electroformed stencil frame bonding is a mix ratio, a temperature and a few tension readings; on the line it is simply that every sheet goes on the machine in the same taut state.
Contact:赖先生
Phone:+86 18938693450
Tel:0755-2708-8292
Email:yw9@zldsmt.com
Add:深圳市宝安区福永镇新和村福园一路华发工业园A3栋
 Zhuolida